Molang Bunny free pattern

                                          It's the most wonderful time of the year..!!

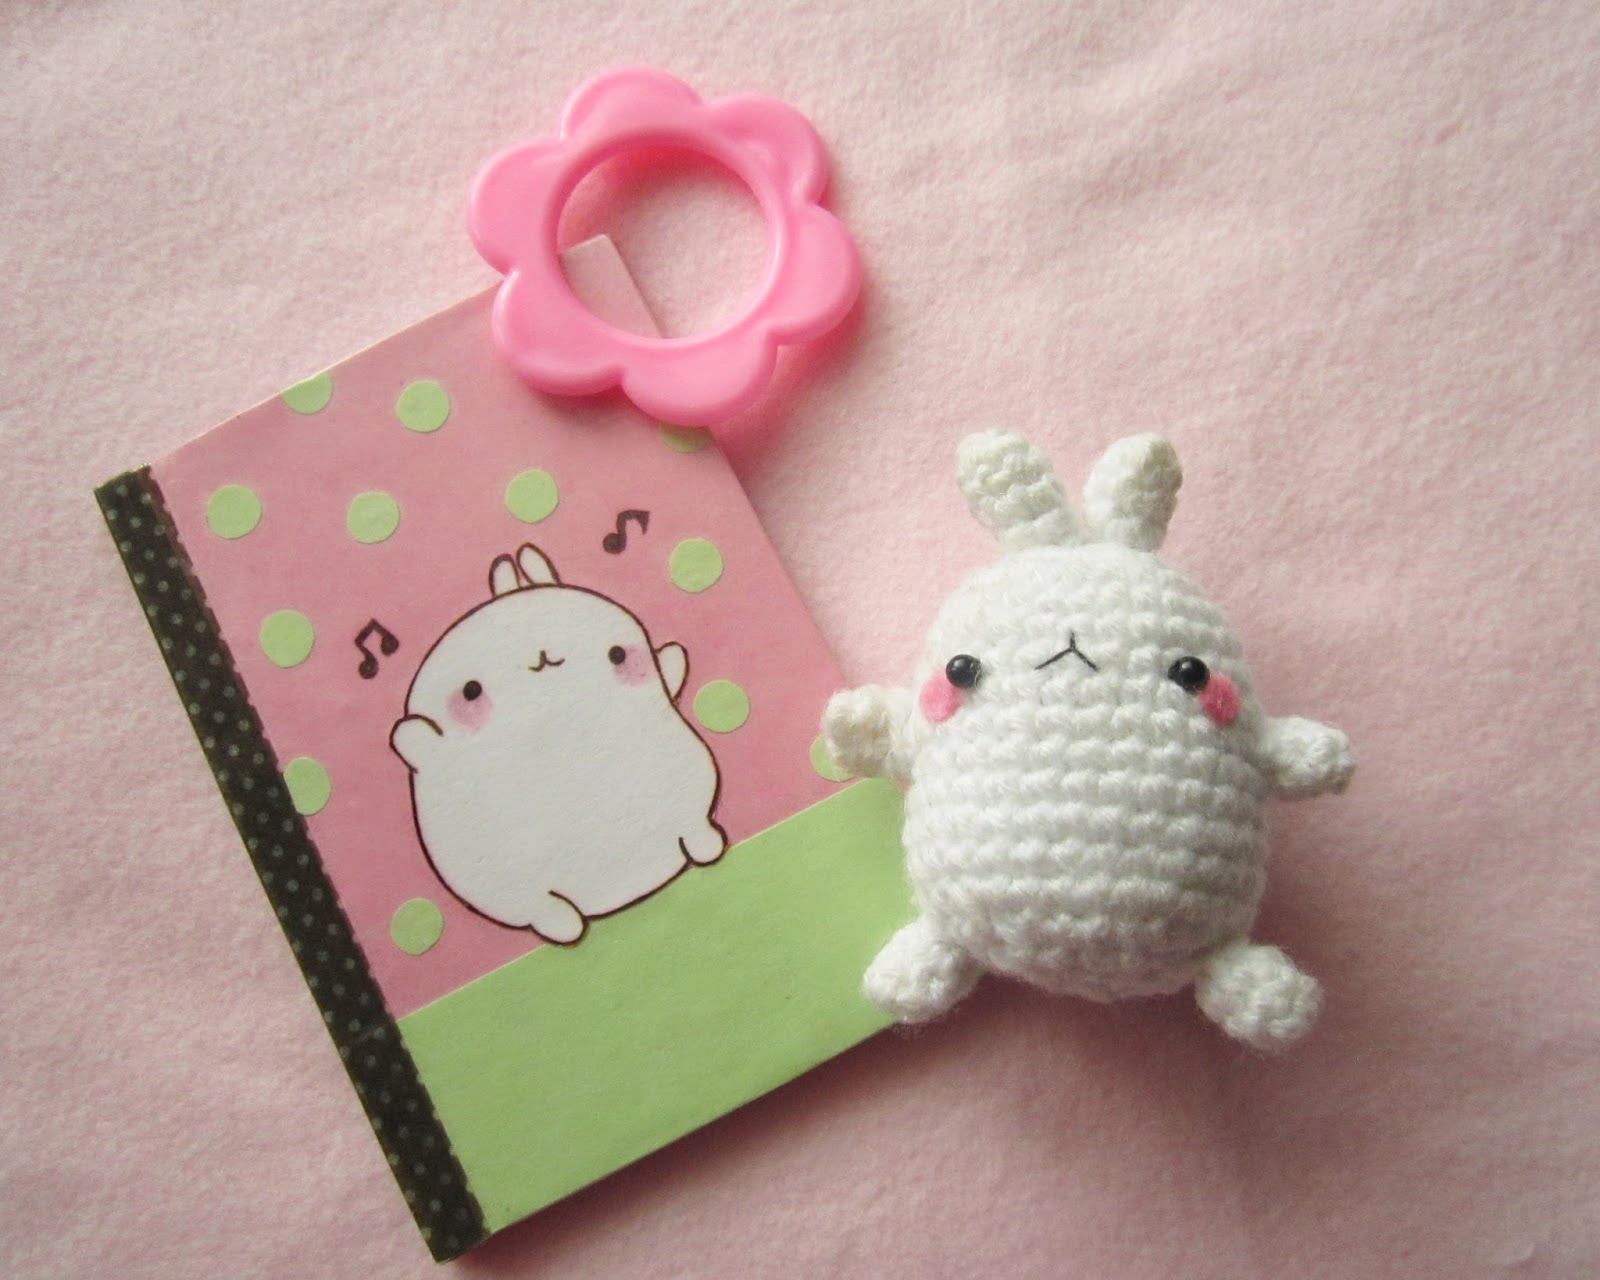
December will always remain as my favorite month of the year. It's the season of joy and celebration. Christmas is all about sharing and spending time with your loved ones. It is also the time to show your love by giving presents to ones that truly matters. Here is a little Christmas Molang bunny pattern for you guys as a little Christmas present from me.


 Materials needed:
Acrylic yarn in white, red and green color
Crochet hook according to the size of your yarn
Black beads for eyes
Embroidery floss for mouth
Tapestry needle

This project is worked in continuous rounds unless stated otherwise
sc -single crochet
st- stitch
dec- one single crochet decrease
sl st - slip stitch

hdc - half double crochet

Head and body:
R1: 7 sc in magic ring (7)
R2: 2sc in each st (14)
R3:  *sc in next st, 2 sc in next st* rep **(21)
R4: *sc in next 2 st, 2sc in next st*, rep ** (28) 

R5-9:: sc in each stitch (28)

Switch to red color
R10-13: sc in each stitch (28)
Switch to white color
R14: sc in each stitch (28)  
R15: *sc in next 2 st, dec 1 in next st*, rep **(21) 

R16: *sc in next st, dec 1 in next st*, rep ** (14) 
stuff firmly
R17: sc dec in each st (7)Fasten off.

Hands: (make 2)

with white color yarn
R1: 5sc in magic ring (5)
R2: sc in each stitch (5)
switch to red color
R3: sc in each stitch (5)

 Legs: (make 2)
with white color yarn
R1: 5sc in magic ring (5)
R2-3: sc in each stitch (5)
 
Ears (Make 2)

R1: 6 sc in magic ring (6)
R2-4: sc in each stitch (6)

For shawl:
With grenn or red color yarn, ch 56.
Hdc in second chain from hook and Hdc in each of the foundation chains. 
Fasten off and weave in the ends
 

Assembling: 

Join hands, legs and ears to the body.
Add in black beads for eyes between row 7 and 8.
Embroider the mouth using black thread.
Add blush using little pink felt.
Wrap the shawl around the neck.
Your little Christmas molang is done! 


You can turn this into a cute christmas ornament by adding a little string at the head.


Hope you guys like making this. Cheers


Snail mail and a surprise!

Once when i was tidying up my room, i came across a box containing letters and cards that i received from my friends and family during my childhood days. After finishing school, Internet, Mobile phones and texting becomes so common that i rarely send or receive any mails through post. Looking back at those handwritten letters and beautiful cards nostalgia hits me hard and wonder why don't we write to each other anymore. So i started the habit of writing letters to my friends and some new pen pals. It's such a wonderful feeling when you get to open a long awaited mail from your pals.
Here are some mails that i received recently.

A cute letter along with tea and washi samples from an Indonesian friend

Some Heidi Swapp foiled cards, stickers and embelishments that i received from a giveaway contest in Instagram.

Beautiful fabric bag, yarn and some beads to make jewelry from my blogging friend Joy

and finally the giveaway price from Tammy of T's daily treasures The package consisits so much goodies and i loved everything. She also sent a cute little dress for my little one and i really loved the cross stitch magnet apart from the lovely crocheted items she sent. Thank you so much Tammy:)


If you are interested in snailmailing, You can find pen pals easily on instagram under the tag snailmail, penpalswanted.  Now off to write some reply letters. Have a wonderful day all:)

Crochet coasters

Hello friends, hope you all are doing good. Having a little baby around means the only time you get to spend for creating or crafting is while she's asleep. Here are some pictures of crochet coasters that i managed to whip up during those times.


I really loved the flower coaster pattern. It's a free pattern from A spoonful of sugar if you like to make one. 


It's perfect to place my mom's delicious Gulab jamun....


..... or to place steaming hot tea that i enjoy in cold rainy days.


I even made some for my snail mail buddies and they loved it.


Hope you like it. Have a wonderful day all. Much love :)

Amigurumi Panda free pattern

Hello lovelies! Thanks for all the love you've shown to my Amigurumi teddy pattern. It's a joy to see people make amigurumi dolls out of that pattern and inspires me to create more. Today i'm here with a panda couple pattern. Head over below for instructions.


Materials needed:
Acrylic yarn in black and white colors
Crochet hook according to the size of your yarn
Little piece of black felt (for eyes and mouth) and pink or red felt (for bows)

Tapestry needle

This project is worked in continuous rounds unless stated otherwise
sc -single crochet
st- stitch
dec- one single crochet decrease
sl st - slip stitch

Head and body:
R1: 7 sc in magic ring (7)
R2: 2sc in each st (14)
R3:  *sc in next st, 2 sc in next st* rep **(21)
R4: *sc in next 2 st, 2sc in next st*, rep ** (28) 

R5: *sc in next 3 st, 2sc in next st*, rep ** (35)
R6-10: sc in each stitch (35)
R11: *sc in next 3 st, dec 1 in next st*, rep **(28) 

R12: *sc in next 2 st, dec 1 in next st*, rep **(21) 
R13: *sc in next st, dec 1 in next st*, rep **(14) 
stuff the head firmly with fiberfill and switch to black color 
R14: sc in each stitch (14)
R15:  *sc in next st, 2 sc in next st* rep **(21)
R16: *sc in next 2 st, 2sc in next st*, rep ** (28) 

switch to white color
R17-18: sc in each stitch (28)
R19: *sc in next 2 st, dec 1 in next st*, rep ** (21) 
R20: This step is optional. If you want a rounded body skip to R21. If you want your panda to sit then sc in back loops of each stitch (21) 
R21: *sc in next st, dec 1 in next st*, rep ** (14) 
stuff firmly
R22: sc dec in each st (7)Fasten off.

Legs: (Make 2)
R1: 7sc in magic ring (7)
R2-3: sc in each stitch (7)
fasten off  and leave a tail for sewing


Hands: (Make 2)
R1: 5sc in magic ring (5)
R2-3: sc in each stitch (5)
Fasten off leaving a long tail for sewing.


Ears: (Make 2)
R1: 6sc in mc 

R2: 2sc in each stitch (12)
R3: sc around (12)
Fasten off leaving a long tail for sewing.

Assembling: 
Attach both hands and legs to the body using tapestry needle.
Sew in both ears to the head.
Cut and paste a small black felt for eyes and nose in the head. 

Add a little felt or crocheted bows to the head (for female panda) or neck (for male panda)


Hope you guys like it. Have fun creating :)

Little girl's bracelet


Hello lovely people.. Here's a tutorial on how to make a simple crystal bracelet. The cheerful color crystals make it perfect for little girls to wear. Read below for instructions.


Materials Needed:
Transparent glass beads in Assorted colors from Pandahall
Pearl beads
Heart shaped charm
Lobster clasp
Jumprings
Crimp beads
Beading Wire

Instructions:
Take a beading wire of length 30 cm
Add Lobster clasp and crimp bead at one end
Start adding crystal beads with the color of your choice
Add some pearl beads in between
Continue this till you've reached the desired length
Add in the heart charm to the bracelet
Finish it by adding a crimp bead and jump ring. Cut off the excess wire.

Hope you guys like it. Have fun crafting :)

DIY rose earring

Hello friends! I'm up here with yet another jewelry tutorial (yes, i seem to make them a lot lately) I love experimenting with different colors and beads and came up with this rose earring. These are made with Acrylic beads which is more suitable for earrings as they are light in weight. Here's the instruction on how to make them.


Materials needed:
Plastic rose beads (2 in number ) from Pandahall
Plastic leaf beads ( 2 in number )
Eight pearl beads
Beading wire
Earring hooks

Instructions:
Take a beading wire of length 15 cm
Place a plastic leaf bead in the centre of the wire and fold the wire in half
Add a rose bead through both the wires
Now add 4 pearl beads through both wires
Finish it off by adding a earring hook at the end.
And your rose earring is done!

Hope you like the tutorial. Have a fantastic day everyone! Cheers and Hugs :)

DIY Blue necklace

Hello lovely people. I'm here with another tutorial in collab with  Pandahall on how to make a simple yet elegant beaded necklace.  See below for instructions.


Materials needed:
Round transparent Seed beads in blue colour
Transparent glass beads in blue colour
small rounded bead in silver colour
Jewelry clasps
Beading wire

Insructions:
Take a beading wire of desired length.
Add a barrel clasp at one end followed by blue seed beads.
Keep adding seed beads till you reach just before the middle.
Add silver bead and transparent blue glass beads alternatively three times.
Add two silver beads. This is the middle part of necklace.
Add blue glass bead and silver bead alternatively 3 times
Now add blue seed beads again tillthe end of your beading wire.
Make sure the seed beads you've added on either sides are of equal length.
Finish it off by adding barrel clasp at the end.
Your necklace is now ready to wear. Hope you like it. Have a fantastic day! cheers:)

Sea themed necklace

Shells, pearls, starfishes, blue waves... well, don't they remind you of beautiful sea?? I had some bunch of beads in different shapes and colors which i thought would make a lovely sea themed necklace. This necklace is perfect for little girls as they are light weight with cheerful colors.


Here's the step by step tutorial on how to make them

Materials Needed
Acrylic Beads of shapes stars, shells from Pandahall
Cat eye beads in blue color
pearl beads
Small rounded silver beads
Beading wire
Barrel clasps

Step 1: Take a beading wire of desired length and add a barrel clasp at one end.
Step 2: add in cat eye bead followed by star bead, silver bead, star bead and a cat eye bead again.
Step 3: add in shell followed by pearl and another shell.
Step 4: repeat step 2 and 3 till you get the desired amount of length.
Step 5: finish it off by adding barrel clasp cap at the end.
Your sea themed necklace is done.


Hope you guys like it. Happy crafting:)

One Lovely Blog Award

I was given one lovely blog award by the wonderful Anna from Annasimplecrochet She has a very captivating blog that focuses on crafting. I also love her delightful pictures of flowers from her garden. Don't forget to check out her charming blog.


Here are the rules:

7 facts about me:
I'm a shy, introverted person.
I love having talkative people around me.
I find crafting and listening to music therapeutic
Afternoon naps are absolutely necessary for me.
I would like to visit Japan one day.
I'm a stationary junkie.
I love reading books.

I nominate the below beautiful blogs for this award:
Mousimi Roy's Luv for krafts
Lavina Agarwal's Life's little treasures
Safal's SafalArts 
Shami's My craft works

Happy crafting friends:)


Simple pearl bracelet tutorial

Hello all! A very happy independence day to my fellow Indians. I still remember waking up early and heading over to school with a little flag on my uniform for flag hoisting ceremony in my childhood years.
Well, moving onto crafts, i made this simple pearl bracelet recently using supplies from Pandahall . This is a perfect beginner project and you can finish it off in no time.


Here's a step by step instruction on how to make this bracelet

Materials needed:
Glass pearls in colors ivory and peach
Rhinestone bead spacers
Beading wire
Lobster clasps and jump rings
Crimp beads.

Instructions:
Step 1: Take a beading wire of length 30 cm.
Step 2: start by adding a lobster clasp and crimp bead. Now add ivory color pearl followed by  a bead spacer.
Step 3: Now add peach color pearl followed by another bead spacer.
Step 4: repeat steps 2 and 3 till you get the desired length of bracelet.
Step 5: Finish it by adding a crimp bead and jump ring. Cut off the excess beading wire.
The pearl bracelet is now ready to wear.


Hope you guys like it. Have a wonderful week ahead :)

This and that..

Hello lovelies! Feels good to be back in blogging. Having a baby around means very little time to do pretty much any other thing, So sorry for missing out posts from my blogging friends. I intend to catch up with you all and see what's happening in your world.
I really miss crafting time lately but i do try my best to squeeze in a little time for them when i can. Here's a little crocheted boots and headband that i whipped up for my baby girl.


Recently I've been addicted to drinking cinnamon tea with lemon and honey. Having them along with butter cookies is a great way to start a day.


Received this wonderful package from my fellow blogging friend Joy from We live at the top of the hill So kind and thoughtful of her to include a lovely card and beautiful dress for my little one. Thank you very much dear.


A close up shot of little flower from our garden.


Have a fantastic day everyone. Much love :)


Amigurumi Teddy bear pattern

Hello lovelies! I love making amigurumi dolls but i don't have enough patience to make larger ones so i always end up making little amigurumi projects. I guess there are people out there who, like me, would wish to make tiny amigurumi dolls that don't consume lots of time. Then this is a perfect project for you to try. These tiny bears measures only around 2.5 inches. Do go ahead and check out the pattern below to make these little teddy bears:)


Materials needed:
Acrylic yarn in colors of your choice
Crochet Hook according to the size of your yarn
Little felt for belly and mouth
Tapestry needle
Black beads or safety eyes
Black embroidery thread

This project is worked in continuous rounds unless stated otherwise
sc -single crochet
st- stitch
dec- one single crochet decrease
sl st - slip stitch

Head:
R1: 6 sc in magic ring (6)
R2: 2sc in each st (12)
R3:  *sc in next st, 2sc in next st* rep **(18)
R4: *sc in next 2 st, 2sc in next st*, rep ** (24)

R5-7: sc in each stitch (24)
R8: *sc in next 2 st, dec 1 in next st*, rep **(18)
R9: *sc in next st, dec 1 in next st*, rep** (12)
R10: *sc in next 2 st, dec 1 in next st*, rep ** (9)
Fasten off leaving a long tail for sewing.

Leg: (Make 2)
R1: 4sc in magic ring (4)
R2:  2 sc in each stitch (8)
R3-5: sc in each stitch (8)
fasten off  the yarn in first leg but do not cut off the yarn in the second leg.
Stuff both legs.


body:
Hold both legs together and sl st the second leg to the other one, 
R1: sc around (16)
R2: sc around (16)
R3: *sc in next 2 st, dec 1 in next st*, rep ** (12)
R4-5: sc in each stitch (12)
R6: *sc in next 2 st, dec 1 in next st*, rep ** (9)
Fasten off and sew in the edges.

NOTE: after stuffing, the legs will seem to be slightly apart (like inverted v shape). In order to make the legs together, with the remaining yarn from the first leg, sew both the legs together at the inner side. This will give a nice finished look)

Hands: (Make 2)
R1: 4sc in magic ring (4)
R2: *sc in next st, 2sc in next st*, rep ** (6)
R3-5: sc in each stitch (6)
Fasten off leaving a long tail for sewing.

Ears: (Make 2)
6sc in mc
Fasten off leaving a long tail for sewing.

Assembling: 
Sew the head to the body and attach both hands to the body using tapestry needle.
Sew in both ears to the head.
Cut a small oval shape felt and glue it to the body.
Cut 2 small half circle felt and glue it to the inner ears
Cut another small oval shape for snout and embroider the mouth and nose to your liking.
Sew in eyes closer to the snout using small black beads.

Note:
Alternatively, you can crochet small oval shapes for the body and snout instead of felt.
Your little teddy bear is done!


Attach a small thread or lanyard at the top of head and your teddy can be used as keychain or bag charm.
Hope you guys like the pattern. Have fun craftting!


Floral crystal bracelet

Hello people! I'm here with another bracelet tutorial in collab with Pandahall This bracelet will make a beautiful piece of accessory to wear on any occasion. Head over below for step by step tutorial on how to make this lovely beaded bracelet.


Materials needed:
Faceted abacus transparent glass beads in color red, orange and yellow.
Small golden beads.
Jump rings.
Jewelry clasp.
Beading wire.
Crimp beads.
Pliers.

Instructions:
Step 1: Take a beading wire of length about 90 cm and fold it into half.
Step 2: Place a jump ring in the folded part of beading wire followed by a crimp bead. Add three golden bead followed by a red crystal bead on either side of the wire.
Step 3: inter cross both wire with a yellow crystal bead.
Step 4: Add three golden beads on either side of the wire.
Step 5: Inter cross the wires using a golden bead, then add a orange bead on either side of the wire and inter cross them using a red crystal bead.
Step 6: add in orange bead on either side and inter cross it with a golden bead.
Step 7: repeat steps 1 to 6 until you get the desired length of bracelet.
Step 8: Finally add in crimp bead, jump ring, jewelry clasp and pass it through crimp bead to secure the clasp.
And your beaded bracelet is ready to wear!


Hope you like the tutorial. Have a fantastic day everyone! Cheers:)

Crystal dangle earring

Hello lovelies! Here's a tutorial on how to make a simple dangle earrings using crystal and pearl beads. They are easy to make but looks lovely when you wear them. Head over below for the instructions.


Materials needed:
Pearl beads
Purple electroplated beads from Pandahall
Small rounded gold beads
Golden yellow crystal beads
Earring hook
Jump rings
Pliers
Beading wire

Instructions:
Step 1: Take a beading wire of length about 20cm.
Step 2: start with a pearl bead in the middle and add in a golden bead, purple bead and gold bead on either side of the pearl bead,
Step 3: add in pearl bead, purple bead and pearl bead with small golden beads in between them on either side
Step 4: now add golden yellow glass bead, purple bead and golden yellow bead with small gold bead in between them.


Step 5: bring both sides of the wire together and add a crimp bead.
Step 6: place a jump ring with earring hook and pass it through the crimp bead and crimp the bead using pliers. Cut off the excess wire.
Your dangle earring is now ready to wear,
You can make this earring using various types of beads in different colors.
Have fun crafting:)

Floating necklace tutorial

Hello lovely people. A very happy mother's day to all of the beautiful mothers out there. Being a new mom made me realize how hard yet wonderful motherhood can be. I couldn't have gone through this phase without the help of my mom. She's been a great support for me and hoping i should be like her to my little one.  Here's a tutorial on how to make a floating necklace which i think would make a lovely gift for mother's day. This time i used  cat eye beads and loved working with it. 


Materials needed:
Glass beads (blue cat eye beads from Pandahall )
White color glass pearls
Small rounded silver beads
Beading wire
Crimp beads
Jewelry clasps

Instructions:
Step 1: take 2 beading wires of length 80 cms each.
Step 2: start by placing a small silver bead into both of the beading wire.
Step 3: add two cat eye bead on one strand and one pearl bead on the other strand. Arrange them in such a way that the pearl bead is in between the two cat eye bead.
Step 4: pass a silver bead into both of the wires.
Step 5: Now add one pearl bead and two cat eye beads on alternative sides to the one we've placed before.
Step 6: again add a silver bead and pass it through both the strands.
Step 7: repeat steps 3 to 6 till you've reached the desired length.
Step 8: finish it off by placing a crimp bead and jewelry clasp at the ends.
Your floating necklace is now ready to wear!

Hope you guys like it. Enjoy this day with your fabulous mom and let her know you appreciate and love her. Have a fantastic day! Cheers :)

Baby love!

"How wonderful life is, now you're in the world"

I find myself repeating this lyrics these days whenever i see my baby girl smile. Did i say a Baby?? Oh yes! I'm happy to announce you guys that we are blessed with a beautiful healthy baby girl on 4th of April.


My due was supposed to be on april 24th but my water broke at around 37 weeks and so my baby girl arrived a little earlier than expected (can't complain as it's a great joy to see her early). Can't believe it's been a month already. Time sure flies by so fast. My mom's been so helpful in taking care of my little one which allows me to take rest.

How true is this quote:)
My little one sleeps all day long and keeps us awake all night.
Otherwise, she's a darling and cries only if she's hungry or when her diaper is full. Well, time for me to grab some sleep before she wakes up. Have a lovely day everyone! Hugs:)

Pearl and crystal earring tutorial


Pearls and crystals always complement each other quite well in Jewelries. Here's a step by step tutorial on how to make a earring using these two combos.


Materials needed:
White pearl beads  from Pandahall
Crystal Glass beads in metallic green colour
Rounded silver beads in small size.
Tigertail beading wire.
Jumprings.
Earring hooks.
Crimp beads.
Pliers.
Instructions (Make 2):
1. Take a beading wire of length about 20 cm
2. Add in 3 crystal beads followed by a pearl bead and 3 silver beads in the middle of the beading wire.
3. Intercross both wires by a pearl bead.
4. Add in 3 crystal bead on one side and 3 rounded silver bead on the other side.
5. Again intercross by a pearl bead.
6. Repeat step 4 and 5. Add in the beads in such a way that the crystal beads and silver beads are alternative in each sides.
7. Enclose it by threading both the wire into crimp bead followed by a jump ring and earring hook and pass it through the crimp bead and cut of the excess wire.


Hope you guys like this tutorial. Have a great day everyone. Cheers:)
Update cookies preferences